D-Link DIR-300
<alertbox> WARNING: This document may contain errors which may result in damage to your router. USE AT YOUR OWN RISK. </alertbox>
Airlink101 AR430W
The D-link/Airlink is very similar to the La Fonera but only has 4MB of flash memory, it uses an atheros wireless device, and second you must access the RedBoot bootloader to install OpenWrt/Gargoyle. It is impossiable to install Gargoyle on a factory default DIR-300, so be warned that it is not as straightforward as with the other routers.
<alertbox> This how-to has been updated 25 July 2012 and now should work without the need for a serial connection
</alertbox>
It appears that Dlink in there wisdom have changed the chipset of the DIR-300.
This procedure only works for revision A
This procedure has been tested and works with
P/N: IIR300NTO....A1G
H/W: A1 F/W: v1.01-tomi-1.0
S/N: P1RK 1850 XXXXX
WARNING: Bricking you router is a high if you get this procedure wrong. A serial cable should bring it back to life but this is quite involved and requires soldering a header on your circuit board
Install Procedure
We need to install a new redboot to do this we need to go to dd-wrt and lookup D-Link DIR-300 and install the supplied redboot
www.dd-wrt.com
Assuming you want to install Gargoyle 1.0.14, then you need to copy the following files to your local TFTP server (for windows use tftp32 http://tftpd32.jounin.net/):
- ap61.ram – Downloaded from the DD-WRT site.
- ap61.rom – Downloaded from the DD-WRT site.
- gargoyle_1.0.14-atheros-root.squashfs
- gargoyle_1.0.14-atheros-vmlinux.lzma
Start the TFTP server and replace the bootloader as described here: http://www.dd-wrt.com/wiki/index.php/DIR300.
Install Method
Configure your local ip to 192.168.20.80 connect your lan cable to the WAN port of the router. unplug the power cord and replug it. Now enter the redboot using telnet and ip 192.168.20.81 and port 9000. connect your lan cable to the dir300 wan port. you might need several tries since its only available for 1 second after aprox. 5 sec. of booting (in the appendix is a windows instruction for easy connecting to redboot)
DIR-300 Info:
IP: 192.168.20.81/255.255.255.0, Gateway: 0.0.0.0
Default server: 192.168.20.80
Now start a local tftp server on your computer and place ap61.ram as well as ap61.rom in the root dir of this server
back to the redboot enter:
load ap61.ram
go
Now a new temporarily bootloader should start. (on serial console it will display some warnings. but you don't need to worry about this) Plug you lan cable to the lan port of the dir-300. reconfigure your ip to 192.168.1.2 and connect via telnet to 192.168.1.1 and port 9000.
Important: while doing the following steps. never unplug the lan cable or the power supply
fis init
About to initialize [format] FLASH image system - continue (y/n)? y
*** Initialize FLASH Image System
... Erase from 0xbffe0000-0xbfff0000: .
... Program from 0x807f0000-0x80800000 at 0xbffe0000:
ip_address -h 192.168.1.2
IP: 192.168.1.1/255.255.255.0, Gateway: 0.0.0.0
Default server: 192.168.1.2
load -r -b %{FREEMEMLO} ap61.rom
Using default protocol (TFTP)
Raw file loaded 0x80080000-0x800a8717, assumed entry  at 0x80080000
fis create -l 0x30000 -e 0xbfc00000 RedBoot
An image named 'RedBoot' exists - continue (y/n)? y
... Erase from 0xbfc00000-0xbfc30000: ...
... Program from 0x80080000-0x800a8718 at 0xbfc00000:  ...
... Erase from 0xbffe0000-0xbfff0000: .
... Program from 0x807f0000-0x80800000 at 0xbffe0000: .
fconfig boot_script true
fconfig boot_script_timeout 10
fconfig bootp false
fconfig bootp_my_gateway_ip 192.168.1.1
fconfig bootp_my_ip 192.168.1.1
fconfig bootp_my_ip_mask 255.255.255.0
fconfig bootp_server_ip 192.168.1.254
fconfig console_baud_rate 9600
fconfig gdb_port 9000
fconfig info_console_force false
fconfig net_debug false
fconfig boot_script_data
boot_script_data:
.. fis load -l vmlinux.bin.l7
.. exec
Enter script, terminate with empty line
>> fis load -l vmlinux.bin.l7
>> exec
>>
Update RedBoot non-volatile configuration - continue (y/n)? y
... Erase from 0xbffe0000-0xbfff0000: .
... Program from 0x80ff0000-0x81000000 at 0xbffe0000: .
DD-WRT>
DD-WRT> reset
now the unit will reboot and the new bootloader will be executed and is waiting for your connection. this will take 30+ sec.
connect to the bootloader with telnet on port 9000 and ip 192.168.1.1
Install Gargoyle
If DD-WRT is all ready installed on your router start installing Gargoyle form this point.
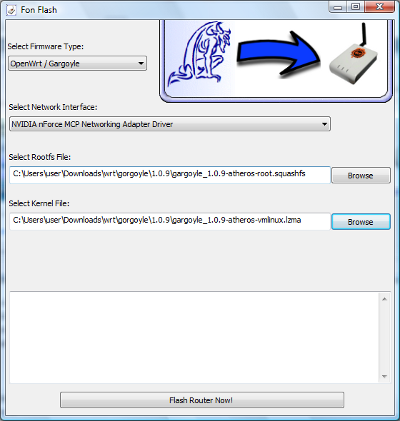
- DownloadFon Flash (special version required) and configure environment
- Select correct Ethernet port
- Load gargoyle files
- gargoyle_x.x.xx-atheros-root.squashfs
- gargoyle_x.x.xx-atheros-vmlinux.lzma
- Plug ethernet cable between router and PC
- Unplug power to router
- With fon flash click “Flash router now!”
- Plug in power to router
- Wait 20 - 30 minutes for router to finish flashing
Router should automatically reboot and install procedure is finished
Windows easy connecting to redboot
Appendix: download putty.exe to c:\ create a file an c:\ called redboot.bat with the following content:
rem echo off
:start
rem ------------------------------------------------
ping 192.168.20.81 -n 1 -w 1 > NULL
IF ERRORLEVEL 1 goto start
rem putty
rem ------------------------------------------------
break
putty.exe telnet://192.168.20.81:9000 -m redboot.txt
exit
create a file on c:\ called redboot.txt with the following content:
^C
start the bat file and power on the router…..here comes redboot


